Welcome!

Thank you for stopping by! Here you will find a variety of things as I post whatever happens to be going on in our home - recipes, crafts, homeschool, birthday parties, travels, meals in muffin tins and more! I'd love to know what you think so please feel free to leave comments!
Showing posts with label Homesteading. Show all posts

Saturday, June 16, 2012

Our New Backyard Residents

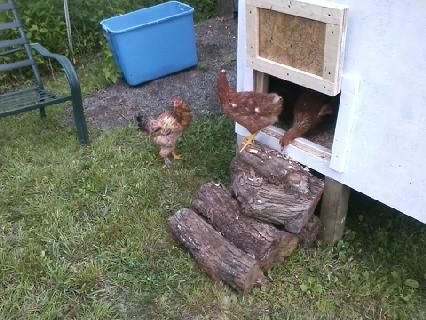
They've been a part of the family for a little over 3 months now, but our chickies didn't get into their permanent quarters until last night. This morning, after breakfast, we went out, opened the door and let the flock have their first look at their new world. We sat back in our lawn furniture to watch the show. Yes, we are easily entertained.

A couple of the reds & a black were the first to pop their heads out.


This is Ariel, Aurora & Jasmine. 

Ariel hung out on the logs a little while & looked around but Aurora & Jasmine ducked back inside.
 

Prince Charming was the 1st one brave enough to actually put feet on the ground.
 

Laural helped make the new waterer. Here she is hauling over the supplies.
 

Micah decided to come get a closeup seat for the chicken watching.
 

When we opened the front door to put a little more bedding material in, the Brahmas decided they were heading out. They stuck together in a group, finding the mulch pile right behind the coop and picked in that for a bit.
 

I love how they all stayed in their safe little group.
 

After a little more exploration, they found some weeds by the fence that they just loved! They pretty much stayed here for the rest of the afternoon.
 

Snow White, Cinderella & Rapunzel look for some tasty greens.
 

Aurora, Tiana & Belle were finally coaxed out of the coop by some food.
 

Pocahontas joined the others for a bite to eat. Ariel & Jasmine went & hid under the coop before running back inside. They weren't quite ready for the great outdoors.

After they were a little more used to their surroundings, the group of Brahmas explored a little further away from the coop but the reds & blacks finished eating at the feeder and went back in the coop. I herded the Brahmas back into the coop in the evening and everyone seemed happy enough. I hope the reds & blacks get a little braver & explore a little tomorrow.

Friday, August 19, 2011

Making Homemade Butter

Since we made the switch to raw milk, I have also started making homemade butter from the lovely cream that rises to the top of our fresh milk. I admit, I was a bit nervous about making homemade butter - it seemed like it would be a lot of work. But, I figured that it was sort of silly to be drinking raw milk and still be buying pasteurized butter from the grocery store, so I decided to go for it. The first time I made it, I used my stick blender and it worked quite nicely. I only used a pint of cream the first time. It made a nice little ball of very tasty butter. The second time I made it, I also used the stick blender but it seemed that the stick blender wasn't too happy about being used for so long and it got a bit hot. I decided that I needed to find a new method of making my butter for next time. I remember reading someplace that you can use an ice cream maker but the ice cream make is a bit of a pain to drag out and set up. I also read you can use a stand mixer. So that is what I did. It came out perfectly! The big bonus is that I didn't have to stand there the entire time, holding a stick blender! After making butter the first time, I realized that while it does take a wee bit of time - maybe 20 to 30 minutes - it really isn't all that hard to do. Plus, it is so worth it because the butter tastes amazing. And now that I know I can use my KitchenAid mixer, it got even easier.

How to Make Homemade Butter from Raw Milk

1. Collect the cream. I try to skim about half the cream off my jars of milk the morning after we bring them home.The farm fills my half gallon mason jars from their large tank so it's mixed up when we first bring it home. Leaving it sit overnight gives it plenty of time to separate. I get about a quart of cream from 3 gallons of milk.  (*Note: Many states don't allow the sales of raw milk but that doesn't mean you can't easily make butter. Just use a carton of heavy cream from the grocery store.)

 You can easily see the cream floating atop the milk.

2. Clabber the cream. Clabber? Yeah, I had no idea what this meant the first time I read it. It means to let it sour. To do this, I let my jar of cream sit out on the counter for a good 24 hours. Some places suggest more time, but I will admit it, the very idea makes me nervous. In fact, my first batch of butter was made from fresh, sweet, unclabbered cream. After sitting out for 24 hours (give or take a few hours), I put it in the fridge for a day or two. When I take it out, it is nice and thick and smells a bit sour. At this point, you can use it as sour cream. I haven't done that yet. 

 My clabbering cream.

3. Beat that clabbered cream! I put the cream into the bowl of my KitchenAid mixer with the flat beater attachment and slowly bring it up to about half speed - 5 or even 6. The cream goes through several stages which are neat to watch. To really get an idea of what each stage looks like, click the picture. Then hit the back button to come back here.

I start mine as soured cream, so it's already thick and creamy. If you start with fresh cream, the first change will be to this sour cream consistency.


 Next, it will get a bit thicker. This stage reminds me a little of that non-dairy dessert topping - a thin but smooth textured whipped cream.


A bit thicker still - this is a soft peak stage.


Now it's nice and fluffy! Stiff peaks will form. You need to start scraping down the bowl a little at this point.


A couple minutes more and it starts to break down and look a little lumpy.


Then it gets really wet looking and grainy.


Then, almost suddenly, bam! Butter & buttermilk appear! You will want to turn the mixer down at this point (maybe a little before) or you and everything around the mixer will get a buttermilk shower.


After it separates, I let it go a little longer to allow the butter grains to come together into larger lumps.


I remove the large lumps of butter to a bowl and  pour the buttermilk into a jar (through a small strainer to catch any butter grains that didn't stick to the larger ball).


And I am left with a nice lump of fresh butter. But it's not quite done.
4. Wash that butter! Yep, wash it. It still has quite a bit of buttermilk in it and that needs to come out before you are finished because the buttermilk might cause the butter to spoil quicker. I take a couple of rubber spatulas and squeeze smaller amounts of butter between them, rinsing in cold running water or a bowl of ice water as I go. I could go out and buy some nice wooden butter paddles, but they're kind of expensive and my spatulas work just fine. I didn't take any pictures of this step because my hands get kind of buttery and I didn't want to butter up my camera.

Once all the butter is clear of buttermilk, I salt it (just a wee bit) and form it into a round cake and put it into the fridge. That's it! Easy, right?

Fresh butter!

I really can't stress enough how wonderful this tastes. It adds such a lovely flavor when spread on pancakes and toast. I haven't baked with it yet because we use it up so fast on everything else. We stopped using margarine ages ago and have been using "real" butter for everything for a while. I am amazed at how much better this tastes. As an added bonus, I have buttermilk that I can use to make pancakes or biscuits.

Now, if you put the health benefits of drinking & eating raw dairy products aside, the best part about this is the cost. I am most fortunate to be able to buy raw milk for $2.50 per gallon. Each week, I buy 3 gallons at a cost of $7.50. From that 3 gallons, I get about 2 1/2 gallons of milk to drink, a pound of butter, 16 oz of buttermilk and 32 oz of yogurt. If you bought that same amount of organic dairy product in the grocery store, you would probably be spending real close to $30, if not more than that. Sure, making our own dairy products from fresh raw milk takes a little bit of time, but if you figure out the savings over the course of a year, we are looking at almost $1200! I don't know about you, but that's huge for us! I know that not everyone is able to get pasture fed, raw milk for such an awesome price, but that's where you figure in the health benefits of raw dairy and realize that even at a higher cost, it's totally worth it!

Shared on:
Tip 
Junkie handmade projects

Thursday, July 21, 2011

Keeping Cool and Odds & Ends

We don't have air conditioning. It's been over 90°F for the past several days with wicked high humidity. That means there is just one sure way to cool off.

Yep, the hose! Laural & Micah have been having a ball playing in the sprinkler.

I think I might join them tomorrow since it's supposed to be another 90's kind of day.

We've had a lot going on here lately. We finally found a source for raw milk and got 3 gallons on Saturday. Besides drinking the yummy goodness, yesterday, I used some of the cream I skimmed off it to make home made butter. It's different but super yummy. I only used a pint of cream so I didn't get a whole lot of butter but it should be enough for about a week.

We've also begun in the process of eliminating certain things from our diet. The two biggies are gluten & soy. So far it isn't too bad but we are totally bread people so the gluten free bread is going to take some getting used to. So far, I've made a loaf of bread which turned out okay but not great and pancakes. The pancakes were really, really awesome! After the kids and I had eaten our fill, I cooked the rest of the batch to put in the fridge for later. They lost a lot in the texture and flavor after cooling & reheating but butter and syrup kind of covered that over. I think I'll cut the recipe in half next time or maybe I will just keep the batter uncooked in the fridge and see how that works when they are cooked up later.

Finally, my garden has been starting produce a few more yummy goodies for us. My cucumbers, zucchini & broccoli are still pretty questionable, probably thanks to the cat that keeps using it for it's litter box, but the other garden bed is coming along pretty nicely.
Today, I picked this nice handful of purple beans and sugar snap peas. We had more snap peas than that but a bunch got eaten already. Laural and I love them! 

We had an uninvited visitor come in with the beans though...
One of the bean leaf beetles that have been chewing on my plants since day one. They nearly killed my green beans but they managed to survive and are still giving me a a few beans. This little guy got to live just long enough to have his picture snapped. I think a little Neem oil is going to find it's way to the garden tomorrow.

This is a little bit of how our week has gone so far. I've got big plans for tomorrow too! Homemade yogurt from raw milk and another try at gluten free bread. Wish me luck!

Friday, August 13, 2010

How to Get Even Hotter on a Really Hot Day or Canning Day - Part 2

I'm almost finished for the night. I'm still waiting on the last batch of beans to finish processing. I ended up with 16 pints and 1 quart of canned beans and 7 pints of freezer beans. I ran out of mason jars. Time to buy more. I'm going to need to rent storage to keep all the jars I will have once I work my way through all the stuff I have canned right now! Anyhow, here are a few pics from the rest of tonight's work:

The first batch of canned beans.

Freshly blanched beans cooling off in an ice water bath.

A quick pat dry before loading them into freezer jars.

Seven lovely pints of beans, ready to make a trip to the freezer.

So, as soon as the last batch comes out of the canner, I will be finished with beans! Elderberries and jelly will be finished up tomorrow! Yay! It's such a good feeling to get fruits and veggies put up for the fall and winter. I'm tired and sore (why can't kitchen counters be 6 inches taller so us tall people don't have to bend over them so far?) but happy to have them done. Time to hop into the hot tub!

Thursday, August 12, 2010

How to Get Even Hotter on a Really Hot Day or Canning Day - Part 1

I got a big surprise last night - a load of green beans and elderberries that needed some loving attention. Since Brian's girlfriend's mom got seriously hurt in a motorcycle accident, she has been unable to tend to her garden while she recovers. Brian & Missy did some picking yesterday and called me to see if I would process them so they wouldn't go to waste. I readily agreed since I would love to have some canned beans and elderberry jelly in my pantry for the fall and winter.

My first step was to survey how many beans and berries there were to do. The answer to that was A LOT! There was a fully stuffed Walmart bag and a half stuffed bag of green beans. Then there was 15 to 20 pounds of elderberries. Wow.

I had half the berries in the sink and half still in the bag. At the same time, I had about a third of the beans in the other sink and the rest in the bag.

So, I started the beans and taught Laural how to snap them and then I started the berries. Before too long Brian and Missy stopped in and they snapped the beans with Laural.

We ended up with 2 1/2 big pots filled with cleaned and snapped beans.

I filled a big pot half way with elderberries to be cooked down for jelly.

About half way through the cooking, they looked like this:

Then I started putting the beans into jars. I filled 16 pint jars and one quart. I still have a lot to do but they will have to be frozen since I'm out of jars! Waiting to be processed:

Into the water they go!

After getting the 1st batch of beans into the canner, it was time to start straining the berries. Here they sit in cheese cloth, drip, drip, dripping away.

Well, I'm getting there. I think I might just put the juice in the fridge and turn it into jelly tomorrow. I will try to get the rest of the beans blanched and in the freezer tonight as well as freeze the remaining elderberries. I will post Part 2 later tonight or tomorrow morning.

LinkWithin

Related Posts with Thumbnails